What's New - October 4, 2026
This release opens the TimeView Assistant beta, puts your support provider's logo in the sidebar, adds new partner contact and billing settings, and brings a round of TimeView fixes

Written by Shir Goldstein
Updated at October 4th, 2026
- Getting Started
- Dashboard
- TimeView
- Energy Apps
- Alerts & Notifications
- Reports
- Administration & Settings
- Partners
- Import & Exports
- Mobile App
- Plans & Packages
- Security & Certification
- Deployment
- Hardware Manuals
- Datasheets & Specs
- Frequently Asked Questions (FAQ)
- Legal
- What’s New
- Bidirectional-power
- Energy Star Portfolio Manager
- Panoramic AI
Table of Contents
Meet the TimeView Assistant (Beta)
What changed
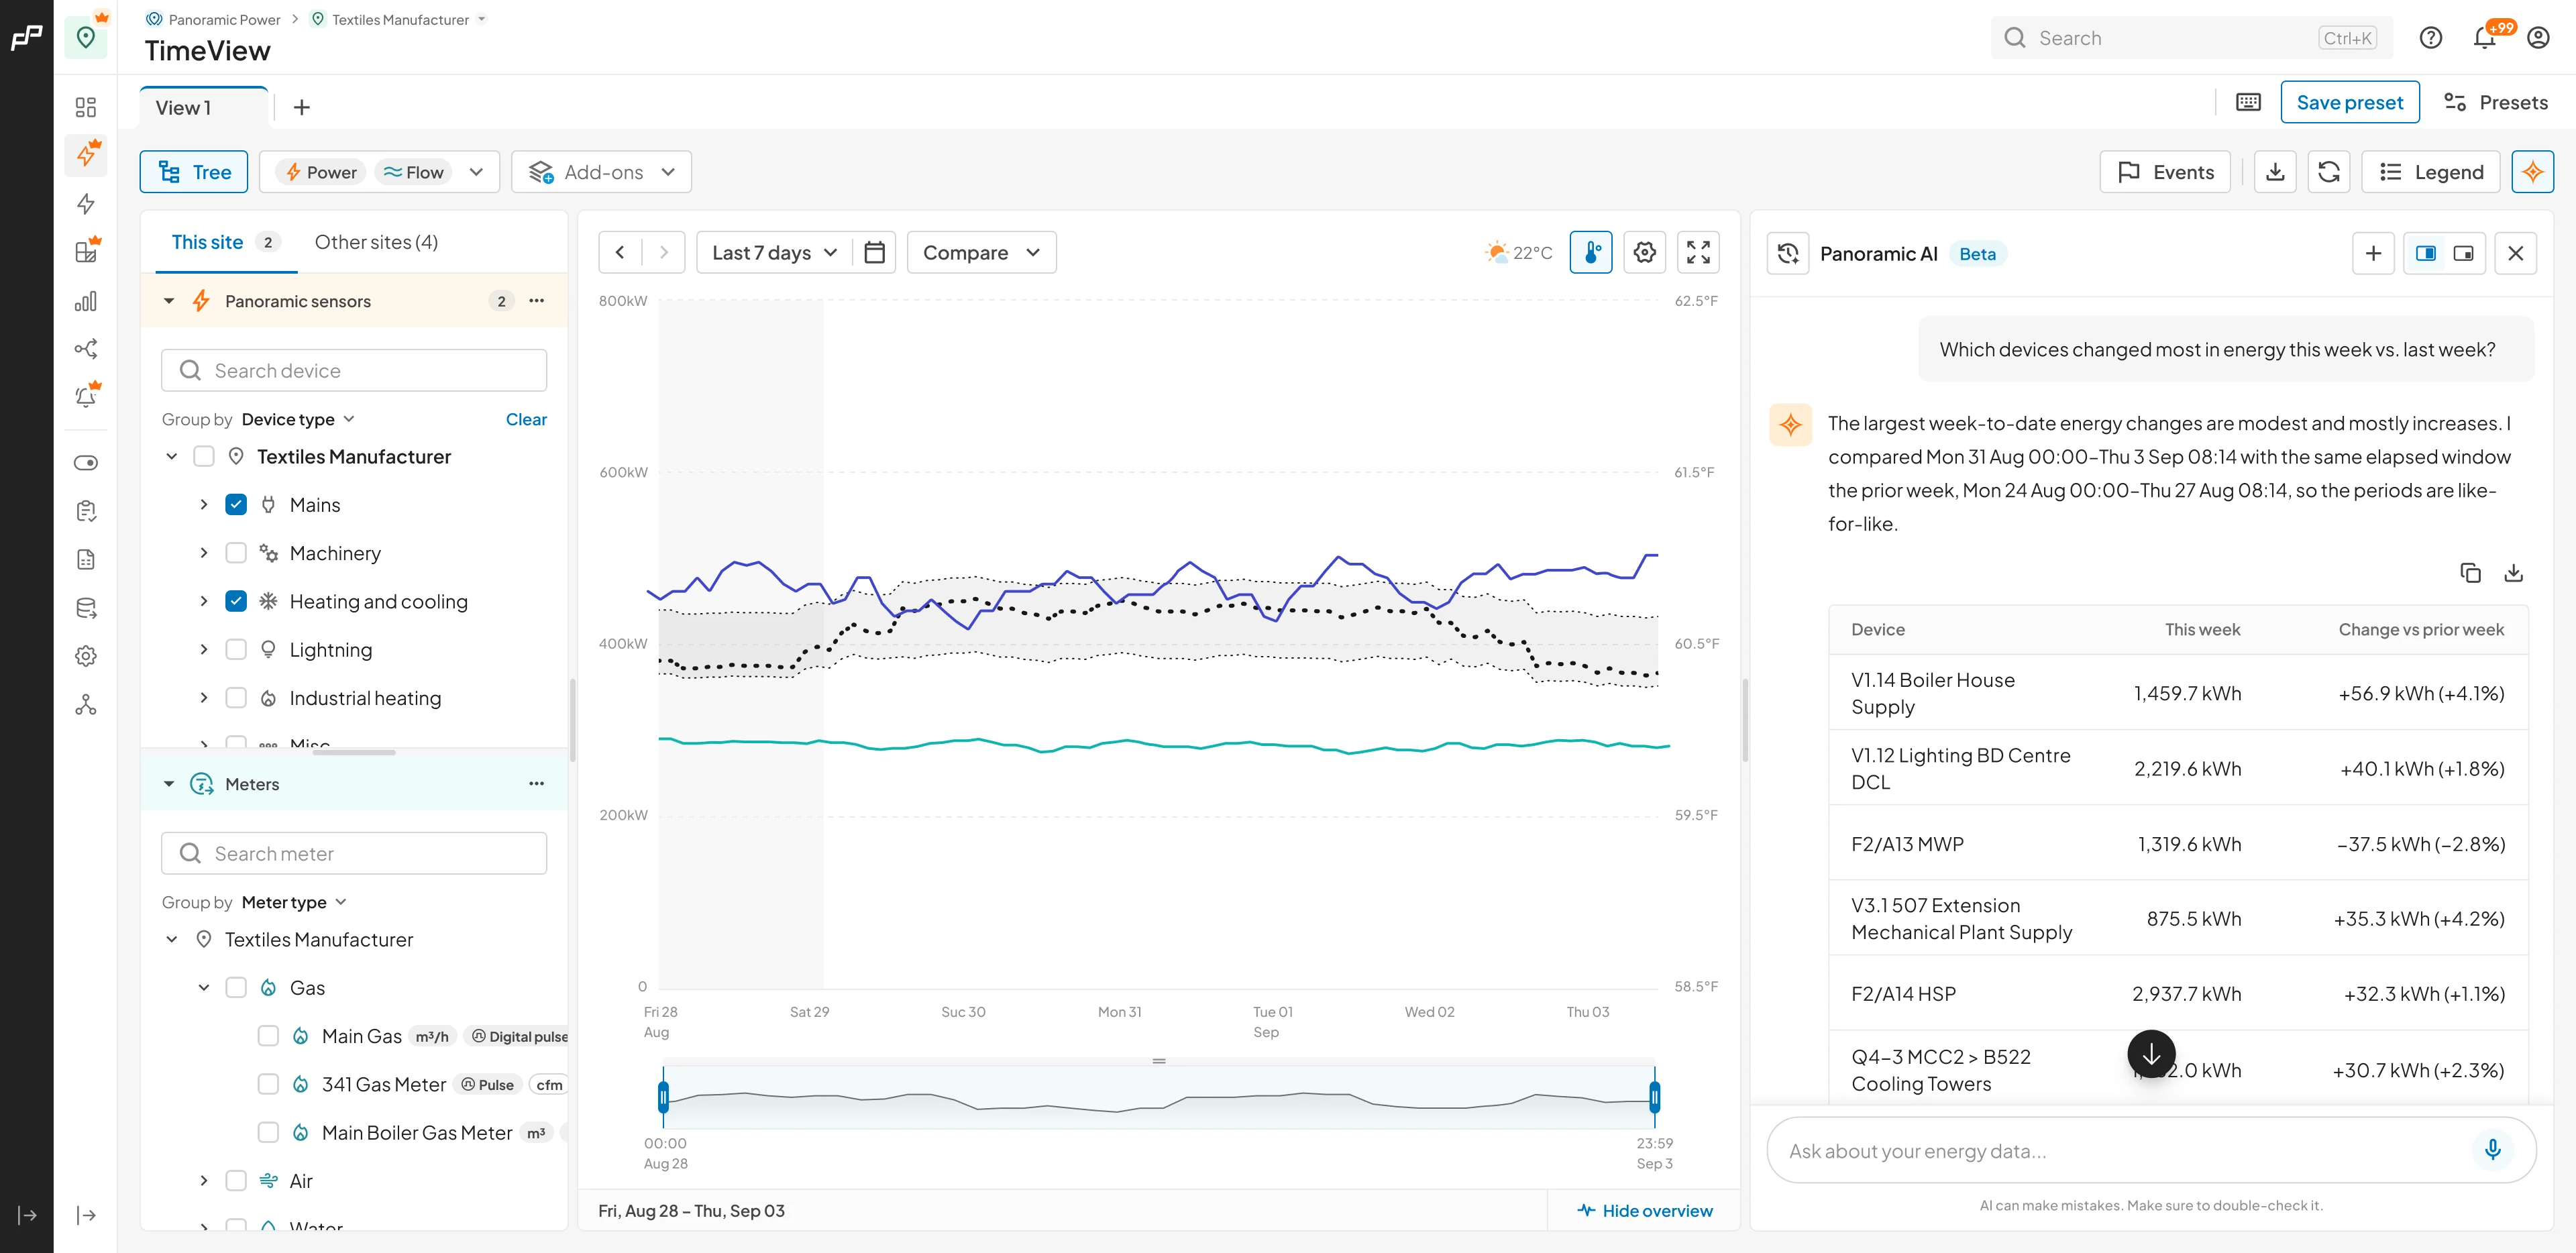
TimeView now has an AI assistant. Ask questions about your site in everyday language, the way you'd ask a colleague, and get answers directly from your PowerRadar data.
Why it matters
You already have the data. Now AI can help you get more from it - explore performance, uncover insights and get to what matters faster.
What the Assistant Can Do
- Understands your context. It works with the site, equipment and time range you're viewing, and takes your operating schedules and usage patterns into account.
- Finds and measures. Quickly find equipment and get power, energy and cost answers - for a single device, a category or your entire site.
- Investigates and compares. Compare performance, surface your biggest consumers and movers, and spot equipment running outside its usual patterns.
- Works like a conversation. Ask follow-up questions naturally, without starting over.
Try asking questions like "Which devices drove this week's energy cost up?" or "How much energy do we use outside business hours?"
And This Is Just the Beginning
During the beta, we're expanding the Assistant with more measurements, longer-range analysis, spike detection, meter and logger support, and answers drawn directly from the PowerRadar Help Center.
Good to Know
- Limited beta through the end of 2026, with seats released in batches.
- For Optimize customers. Using Visualize? Speak with your Panoramic Power partner about upgrading to take part.
- Read-only. The Assistant explores and answers questions about your data, but never makes changes to your account.
Join the beta and help shape what comes next.
Sign up for the TimeView Assistant beta here
Partner Branding: See Who Supports Your Site

What changed
Partners can now upload their company logo to PowerRadar. Once it's added, the logo appears at the bottom of the sidebar on every account and site that partner supports, and on the partner's card in the Support providers page.
Why it matters
If you're a customer, you can now see at a glance who your support provider is, and reach them with one click. If you're a partner, your customers see your brand every time they open PowerRadar.
For Partners: Adding Your Logo
The logo is managed in the Partner logo card of your partner preferences. Only a Partner Owner can add, replace or remove the logo. Other partner users can see it, but can't change it.
- In your partner view, go to General Preferences > Partner Settings, and scroll down to the Partner logo card.
- Drag your logo onto the upload area, or click browse to upload to choose a file. You can upload an SVG, PNG or JPEG file, up to 10 MB.
- Once uploaded, your file appears with its name, size and dimensions (for example, 6 KB, 726 x 97 px). Click Replace to upload a different file, or X to remove it.
- Check the Preview next to your file. It shows how your logo will look at the bottom of both a Light sidebar and a Dark sidebar, since the sidebar can be either, depending on the user.
- Under Background, choose how your logo is displayed:
- Transparent - uses your logo's own transparent background. Choose this if your logo is readable on both light and dark sidebars.
- Light background - places your logo on a light background, so it stays readable on either sidebar. Recommended for logos designed for light backgrounds, such as a dark logo on white.
- Optionally, select Convert to monochrome (PNG and SVG only) to show your logo in a single solid color. The text under the option tells you how it will look with the background you chose:
- With Transparent: "Black on light sidebars, white on dark ones."
- With Light background: "Black on both sidebars, because the background behind it stays light."
- Click Save changes. A Changes saved message confirms your logo is live.
.png)
Tips for the best result
- Use a wide logo. A logo about 4 times wider than it is tall (4:1) fits the space best.
- SVG is the sharpest option. An SVG logo stays sharp at any size. Any text in it is converted to outlines, so the lettering looks the same for everyone.
- PNG and JPEG logos should be at least 320 pixels wide. If your logo is smaller, you'll see a warning, but you can still save it.
- "Blocked by security filter" message. In rare cases, a security filter may block a specific image file. If you see this message, there's nothing wrong with your logo - upload a different version of your logo file (for example, export it again from your design tool).
The logo only appears when your customers view an account or site you support. It doesn't appear in your own partner view.
For Customers: Seeing Your Support Provider
- The logo at the bottom of the sidebar shows the partner that supports your account or site. Click it to open the Contact support provider window, which shows your partner's name and support email, so you can reach them right away.
- No logo uploaded yet. If your partner hasn't added a logo, you'll see Support provided by followed by your partner's name instead. Clicking the name opens the same Contact support provider window.
- Supported directly by Panoramic Power? The sidebar shows Support by Panoramic.
- Collapsed sidebar. When the sidebar is collapsed, a small monogram is shown instead of the full logo.
- Support providers page. Your partner's logo also appears on their card in the Support providers page of your account.
Partner Preferences: New Contact and Billing Settings
%20(1).png)
What changed
The Partner details card in your partner preferences has two new settings: Primary contact and Billing emails. As with the logo, only a Partner Owner can edit them.
Why it matters
Until now, user feedback emails were sent to every partner admin, and there was no place to tell us where invoices should go. Now each type of email reaches the right person or inbox.
To find these settings, go to General Preferences > Partner Settings in your partner view.
- Primary contact. Choose one of your Partner Owners from the list. This person receives your customers' user feedback by email.
- Billing emails. Add the addresses that should receive your invoices and PO information. Type an address and press Enter to add it, then repeat for each address you need (for example, finance, accounts payable and a named contact). An address that isn't valid is rejected as you add it. This field is optional.
- Email for support inquiries. In the Account and site support card, enter the address your customers' support questions should go to. Customers see this address when they click your logo or name in the sidebar. It's kept on file and shown to customers only while your company provides their support. When your company is selected under Provided by, this field is required.
When you're done, click Save changes at the bottom of the page.
Improvements and Fixes
Smaller Improvements
- A date under every day. On longer periods, such as Current Month or Last 30 days, the TimeView chart now shows a date under every day instead of skipping some.
- The selected time shows in the date field. When you choose a time range that isn't a full day, the start and end times now show above the chart.
- Circuits in the Groups tree. When you set Group by to Groups, each group now shows its circuits, with their sensors underneath.
- "Electricity" instead of "Panoramic Sensors". The device tree group in TimeView and Benchmarking is now called Electricity, since it can hold categories, load types and devices, not only sensors.
- A clearer reason when a bridge can't be uninstalled. If a bridge or logger still has meters attached, you now see that reason instead of a generic error.
Bug Fixes
- Full-screen tooltips are back. Hovering over the TimeView chart in full screen now shows the time and values, just like in the normal view.
- Dates step back correctly. Clicking Previous period now moves by exactly one day or one month, without shifting the time - including around daylight saving changes.
- Compare mode shows the full month. When comparing months of different lengths, the 31st day is no longer cut off.
- Month-end dates no longer overlap. In monthly views, the last day labels no longer run together (for example, "2930").
- Date picker fixes. The arrows on the Monthly and Quarterly tabs work again, and you can now select a month that doesn't have a full month of data yet.
- The device tree works as expected. Expand all devices now shows the sensors under each device, and the tree panel can be resized again.
- Flow meter triggers accept zeros after the decimal point. You can now enter threshold values such as 0.01.
Related Articles